Latest announcement: Due to recent abuse of our services, anonymous map uploading has temporarily been disabled. Only registered users will be able to submit new maps.
Shiny World by triad, Komito
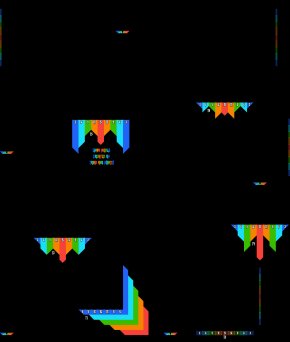
View in Full Size | Play now
Type: Darts
Size: 2560 x 3016, 43KB
Ratings:
Hello! Welcome to Shiny World created by Triad and Komito.
Map information & general Rules:
I wanted to make a Darts map with intersecting variants similar to Super Mario Darts World, after showing Komito the 1st target we soon decided to collaborate together, and I'm glad we did that. Without Komito I wouldn't make this map, it was a pleasure to work with Komito and also a lot of fun!
Variants:
You will notice the map has 5 START platforms lettered "S A" "S B" "S C" "S D" "S E" and 6 target platforms numbered "T1" "T2" "T3" "T4" "T5" "T6".
Before a game begins, players will pick where they start and which target they are aiming at, this is called a "variant" such as "A1" "C4" "E6".
There are a total of 18 variants, ranging from easy to hard in difficulty.
Trench:
Each starting platform has what looks like a small trench cut into the middle:
Teleport your worm inside this, this way it forces perfect worm placement so all you have to do is aim straight up and you will connect your rope to the pixel above without having to move left or right first, it saves time!
No unmarked contact:
No unmarked contact allowed before reaching your target!
This means you can only touch the parts described in the rules for each variation, if you touch any other part while throwing your worm, your turn will be void!
Variants & their unique rules:
A1 / Place your worms in the trench, attach the rope to the pixel directly above the trench, throw your worm with drill to Target 1 making sure your worm banks/transfers before landing - throw your worm swinging only from the pixel.
A1 Gif Demo
A2 / Place your worms in the trench, attach the rope to the pixel directly above the trench, throw your worm with drill to Target 2 so it travels between Targets 1/2 - throw your worm swinging only from the pixel.
A2 Gif Demo
A3 / Place your worms in the trench, attach the rope to the pixel directly above the trench, throw your worm to Target 3 using the arch maneuver - throw your worm swinging only from the pixel.
A3 Gif Demo
B1 / Place your worms in the trench, attach the rope to the pixel directly above the trench, throw your worm to Target 1 - throw your worm swinging only from the pixel.
B1 Gif Demo
B2 / Place your worms in the trench, attach the rope to the pixel directly above the trench, throw your worm to Target 2 using the arch maneuver making sure the worm transfers off the coloured wall before landing - throw your worm swinging only from the pixel.
B2 Gif Demo
B3 / Place your worms in the trench, attach the rope to the pixel directly above the trench, throw your worm to Target 3 using the arch maneuver - throw your worm swinging only from the pixel.
B3 Gif Demo
B4 / Place your worms in the trench, attach the rope to the pixel directly above the trench, throw your worm to Target 4 - throw your worm swinging only from the pixel.
B4 Gif Demo
C2 / Place your worms in the trench, attach the rope to the pixel directly above the trench, throw your worm to target 2 travelling under Target 5 to get there, you must throw above the starting platform - throw your worm swinging only from the pixel.
C2 Gif Demo
C3 / Place your worms in the trench, attach the rope to the pixel directly above the trench, throw your worm to Target 3 using the arch maneuver - throw your worm swinging only from the pixel.
C3 Gif Demo
C4 / Place your worms in the trench, attach the rope to the pixel directly above the trench, throw your worm to Target 4 travelling over Target 5 and under Target 6 - throw your worm swinging only from the pixel.
C4 Gif Demo
C6 / Place your worms in the trench, attach the rope to the pixel directly above the trench, throw your worm to Target 6 - throw your worm swinging only from the pixel.
C6 Gif Demo
D2 / Place your worms in the trench, attach the rope to the pixel directly above the trench, throw your worm to Target 2 travelling under Target 6 doing a transfer off the right side blue wall of Target 5 before landing - throw your worm swinging only from the pixel.
D2 Gif Demo
D3 / Place your worms in the trench, attach the rope to the pixel directly above the trench, throw your worm to Target 3 travelling under Target 6 and Target 5 - throw your worm swinging only from the pixel.
D3 Gif Demo
D5 / Place your worms in the trench, attach the rope to the pixel directly above the trench, throw your worm to Target 5 travelling under Target 6 - throw your worm swinging only from the pixel.
D5 Gif Demo
D6 / Place your worms in the trench, attach the rope to the pixel directly above the trench, throw your worm to Target 6 by doing a bank off the coloured wall to the right side of the starting platform - throw your worm swinging only from the pixel.
D6 Gif Demo
E2 / Place your worms in the trench, attach the rope to the pixel directly above the trench, throw your worm to Target 2 travelling over Target 5, you must throw the worm under the starting platform not above - throw your worm swinging only from the pixel.
E2 Gif Demo
E3 / Place your worms in the trench, attach the rope to the pixel directly above the trench, throw your worm to Target 2 by doing a transfer off the coloured wall to the left which is above starting platform 3 - throw your worm swinging only from the pixel.
E3 Gif Demo
E6 / Place your worms in the trench, attach the rope to the pixel directly above the trench, throw your worm to Target 6 by doing a transfer off the coloured wall to the top right of the map - throw your worm swinging only from the pixel.
E6 Gif Demo
Enjoy
Added on: 7th July 2015, 11:31
Downloads: 192
Comments: 0 (read/write)
Favorites: This map is on the favorites list of 1 user.

Worth: 3 EXP
Features: Remix. (complain/suggest)